DlhSoft Gantt Chart Web Library
SharePoint® Web Parts
Documentation
Prerequisites
To install and use the SharePoint® Web parts for DlhSoft Gantt Chart Web Library you need:
· SharePoint® Services 3.0 / SharePoint® 2007 / 2010 / 2013 or above;
· Optionally, Visual Studio® 2010 or above, to supplementary extend features by class overriding.
Installation
To install the SharePoint® Web parts for DlhSoft Gantt Chart Web Library to a SharePoint® deployment please follow these steps:
· Copy DlhSoft.GanttCharts.dll and its dependency files (*.dll) included within this package to the Bin folder of your SharePoint® deployment (usually C:\Inetpub\wwwroot\wss\VirtualDirectories\[port]\bin);
·
Add the DlhSoft Web parts as safe controls in
the Web.config
file of your SharePoint® deployment
(usually C:\Inetpub\wwwroot\wss\VirtualDirectories\[port]\Web.config):
<SafeControl
Assembly="DlhSoft.GanttCharts, PublicKeyToken=6071b28da0134838" Namespace="DlhSoft.GanttCharts" TypeName="*"
Safe="True" AllowRemoteDesigner="True"
/>
· Further configure the Web.config file of your SharePoint® deployment to use either:
o
WSS_Medium trust level, if you plan to use the component in
read only mode (only displaying an item list as a Gantt Chart):
<trust level="WSS_Medium"
originUrl="" />
o
Full
trust level, if you plan to use the component in read/write mode (displaying
and updating an item list using an interactive Gantt Chart):
<trust level="Full" originUrl="" />
· Upload the Web part description files (*.dwp) included within this package to the SharePoint® Web site root application using an administrative account from your browser: Site Actions: Site Settings; Galleries: Web Parts; Upload: Browse…, etc.
Get Started
To use the SharePoint® Web parts for DlhSoft Gantt Chart Web Library please follow these steps:
· Open the target SharePoint® application in your browser, and browse to the page you want to add the Gantt Chart Web part to;
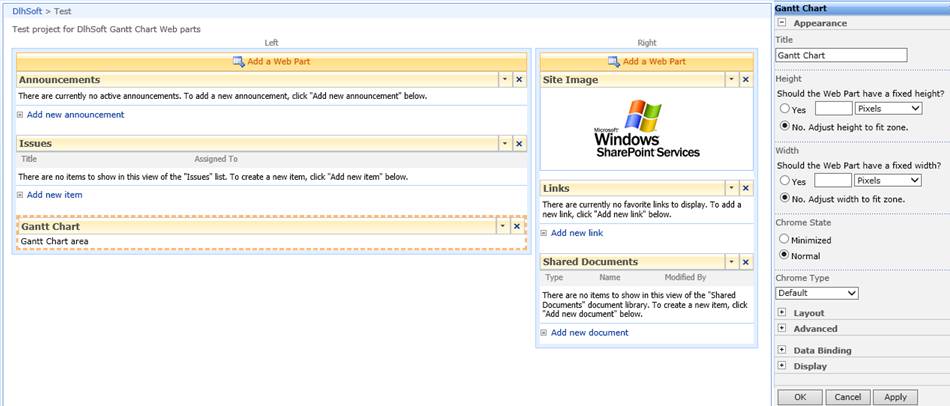
· Enter Edit Page mode for the Shared page, and click an Add a Web Part button in the Web part zone of your choice;
· In Add Web parts dialog window, select Gantt Chart Web part and then click Add button;
·
Click the top-right arrow button from the newly
added Web part to open the Gantt Chart Options sidebar displaying
miscellaneous properties that you may
set, and click Modify Shared Web part:
· Ensure that the Gantt Chart Web part component properties are set up correctly for your data set (see Configuration section below for more details):
o Set the required data list and data binding field names to indicate the item list to bind to and the appropriate and correctly typed item properties from your data source;
o Set the other properties according to your application requirements.
·
Exit Edit
mode for the page, and use the Gantt
Chart Web part to test functionality; if needed, go back to the previous step
and perform further configuration according to your change requirements;

· Note: Without a DlhSoft license set up as indicated in the following section, the application may display nag screens periodically, indicating that you are only allowed to test the product, and not use it in production.
Configuration
To configure the SharePoint® Web parts for DlhSoft Gantt Chart Web Library in your application please follow these steps:
·
Enter Edit
mode for the page that contains the Gantt
Chart Web part you need to configure, and click its top-right arrow button
and click Modify Shared Web Part to
open the Options side bar:
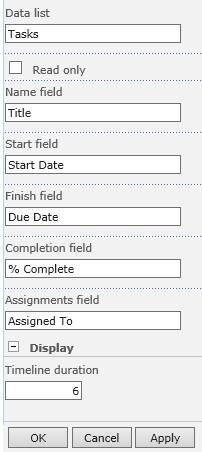
· In Options side bar, expand Data Binding section, and configure the specific component settings as necessary:
o Data list (required):
§ Represents the displayed name of an existing item list to bind to.
o Name field (required):
§ Represents the name of the content property of your task items, indicating the task names, codes, or other displayed indicatives.
§ The referenced item property must exist and its values should be of String type.
§ Task names are displayed as tool tips when hovering Gantt Chart bars, and permanently to the right side of the displayed bars.
o Start and Finish fields (required):
§ Represent the names of the start and finish properties of your task items, indicating the task start and finish dates.
§ The referenced item properties must exist and their values must be of Date type.
§ Task start and finish dates are used to set up the associated task bars horizontally in the Gantt Chart; the end user may drag and drop task bars and their ends horizontally to update task start and finish times.
o Completion field:
§ Represents the name of the completion indicator property of your task items, indicating the task completion percentage, when provided.
§ When set, the referenced item property must exist and its values must be of Double numeric type.
§ When set, task completion values are used to set up the associated task completion bars horizontally in the Gantt Chart, within the main task bars; the end user may also drag and drop task completion bar ends horizontally to update task completion times.
o Assignments field:
§ Represents the name of the assignments property of your task items, indicating the resource(s) assigned to the task.
§ When set, the referenced item property must exist and its values should be of String type.
§ When set, the task assignments are displayed to the right side of the associated Gantt Chart bars, following the task names.
· Supplementary, if you need to access the base ASP .NET control displayed by the Gantt Chart component and use its internal features, write custom code such as inheriting from the GanttChartView class within the library and use its GetBaseControl method to reference it internally.
Licensing
Installing a usage license for the main DlhSoft Gantt Chart Web Library product will not work with SharePoint® based Web applications that don’t have full trust permissions granted. To apply the XML license content to your SharePoint® application and remove nag screens please follow these steps instead:
·
Edit the Web.config file of your SharePoint® application and
configure it as indicated below:
<configuration>
<configSections>
[…]
<sectionGroup
name="applicationSettings" type="System.Configuration.ApplicationSettingsGroup, System,
Version=2.0.0.0, Culture=neutral, PublicKeyToken=b77a5c561934e089"
>
<section name="DlhSoft.GanttCharts.Settings"
type="System.Configuration.ClientSettingsSection,
System, Version=2.0.0.0, Culture=neutral, PublicKeyToken=b77a5c561934e089"
requirePermission="false" />
</sectionGroup>
</configSections>
[…]
<applicationSettings>
<DlhSoft.GanttCharts.Settings>
<setting name="GanttChartViewLicense"
serializeAs="String">
<value>[…]</value>
</setting>
</DlhSoft.GanttCharts.Settings>
</applicationSettings>
</configuration>
· Alternatively, if you design a custom Web part inheriting from the Dlhsoft Web part class configure a DlhSoft SetLicense method call, using the component namespace (assuming C# language is used for development):
DlhSoft.GanttCharts.Licensing.GanttChartView.SetLicense("[...]");
o Occasionally, you might also use other ASP .NET control instances in your LightSwitch™ application; to apply licensing for these components, use this method call in the application’s initialization code, replacing Component with the actual referenced type name (such as ScheduleChartView, LoadChartView, etc.):
DlhSoft.Web.UI.WebControls.Licensing.Component.SetLicense("[...]");
· Fill in the entire content of the license XML file received from DlhSoft instead of the ellipsis area(s) above, directly in code and escaping doubling quotes inside the XML content as required by the storage file or programming language (or reading it from a resource file you configure in your application yourself).
o To extract the content from the XML license file, open it in Internet Explorer (or another browser), and select View Source (from the context menu of the displayed XML); your text viewer/editor application will open (e.g. Notepad), select all content (using Select All command from the Edit menu) and copy it to the clipboard (using Copy command from the Edit menu);
o Depending on your storage file type or programming language, you may also need to escape tag characters (<, >) and/or double quote characters (“) to ensure the content or code remains valid; within Web.config, replace tag characters with their XML counterparts (> instead of <, < instead of >), and in C#, for example, insert a backslash (\) character before each double quote character inside the XML content, or duplicate them (“”) if you use an at prefix for your string (@):
<value><License>[…]</License></value>
DlhSoft.GanttCharts.Presentation.Controls.Licensing.GanttChartDataGrid.SetLicense(
@"<License>[…]<Type
Name=""DlhSoft.Windows.Controls.GanttChartDataGrid""
Version=""4"" />[…]</License>");
o If you wish to get the Application source code file uncluttered, you may alternatively record the entire XML content in an application resource and then use custom code to load that resource and pass the string to SetLicense method call using a variable.
· Depending on the product edition that you have purchased a license for, you will be able to apply it to all or only to a subset of the available component types:
o Standard Edition: licenses all component types;
o Basic Edition: licenses Gantt Chart and Schedule Chart component types only.
Notes
· SharePoint® Web part components are available only for a subset of the components included in the ASP .NET library, and will provide only a subset of the features available in the main product;
· You may supplementary configure and use the standard ASP .NET components in your SharePoint® application (assuming full trust permissions are granted), but this path may require complex technical knowledge and development skills.